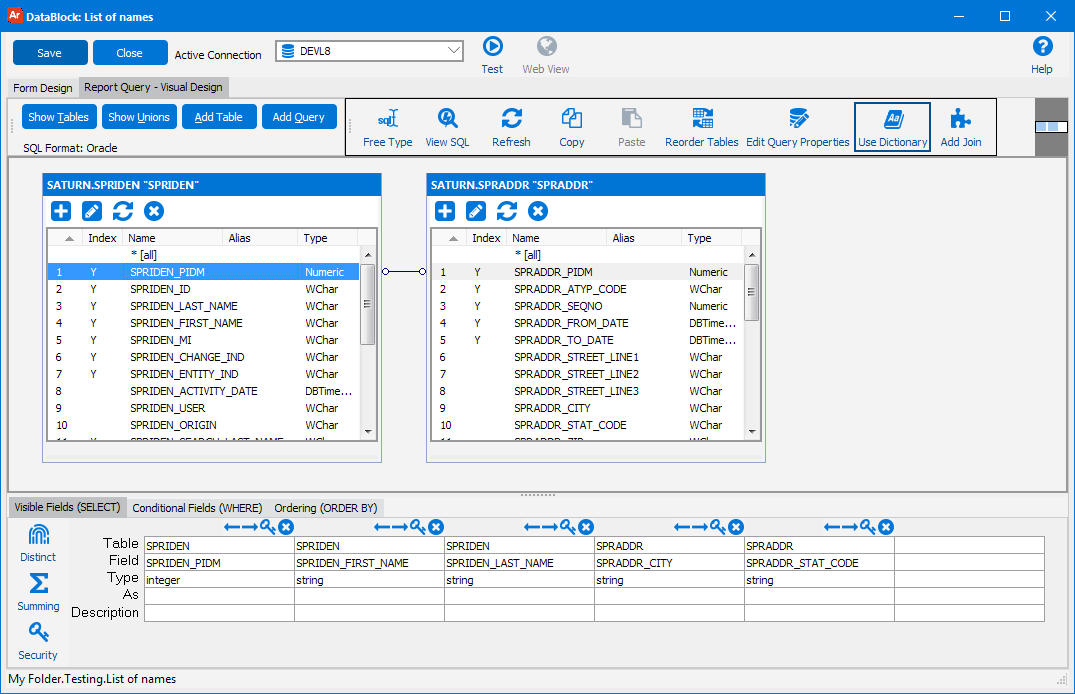
Report Query - Visual Design
In order to create reports that can be quickly printed, saved as a PDF file, or even scheduled to be run in the evening, you must first create your Report Query. The Report Query creates the dataset that will be used by the report generator to create the report. You can create the Report Query using the visual designer or by typing out the SQL yourself in the Free Type window. The visual designer has been built to support a variety of databases. Some features of databases are proprietary are not available using the visual designer as these features are not shared by most other databases.
To read a step-by-step tutorial on how to create a Report Query, refer to Example 2 - Report Query in the Argos DataBlock Designers Guide.

The visual designer has the following options:
- Show Tables - displays a listing of all tables in the schema that you have access to. To add a table from the list double-click on it. Note: If you have access to many database tables, be patient while Argos reads in the table metadata.
- Show Unions - allows you to add UNION, UNION ALL, MINUS and INTERSECT unions to your Report Query. All databases may not support all four types of union.
- Add Table - Used to add a table or view to your query. If you know the name of the object you want, use this button to type in the name to add it. This is generally much quicker than using the Show Tables button on databases with many objects.
Note for Oracle users: Oracle also provides database synonyms, which are like shortcuts to a table or view. You can add a synonym instead of a table but there are two things to be aware of. First, Argos cannot read the table metadata for a synonym (as it doesn't exist), so Argos will not autojoin a synonym to anything else. Second, if a synonym has the same name as two or more objects, Argos will prompt you for which one to use to retrieve the field names. - Add Query - Add a subquery (query within a query) to your conditional WHERE clause, or add an inline view subquery into the FROM clause.
| Icon | Name | Definition |
|---|---|---|
|
|
Free Type | If you decide you would like to create your query in the Free Type editor instead, click this button. This will allow you to enter SQL directly. Note: Your query must be designed with the visual designer or with Free Type, you cannot use both for the same query. The visual designer will generate SQL statements. Be cautious when modifying these statements as your modifications will be lost if someone subsequently modifies the visual design (as the SQL will be regenerated from the visual design). |
|
|
View SQL | See the SQL generated from the query you built in the visual designer. |
|
|
Refresh | Refresh the tables in your Query. |
|
|
Copy | Copies the entire visual design to the clipboard. |
|
|
Paste | Pastes a visual design from the clipboard. This will overwrite the existing design. |
|
|
Reorder Tables | Change the creation order of the tables on this form by moving them up or down the list. This is typically done to create a more efficient execution of the query. |
|
|
Edit Query Properties | Modify data connection settings. It is recommended that these settings are left set as their defaults unless otherwise instructed by an Evisions support technician. |
|
|
Use Dictionary | Turn on the use of the Data Dictionary feature. |
|
|
Add Join | Create a custom join between tables. |
Joins
When a new table is added to the visual query design, Argos examines the table meta data to determine if any pre-defined relationships exist (foreign keys). If a relationship between tables is defined by the database, Argos joins the tables (which you can then modify if desired).
To manually create a Join, select the field from one table and while holding down the mouse key, draw a line to the field in the second table that you wish to join.
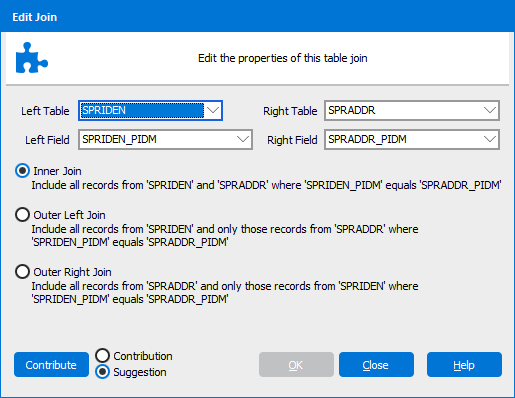
By default an Inner Join is created. To edit the properties of the join, right click or double-click on the join line. Argos supports Outer right and Outer left joins.

Visible Fields

There are two ways of adding a field to a query. Double clicking on a field name in the table description adds it to the end of the currently open query tab (the SELECT, WHERE, or ORDER BY clause). You can also drag and drop fields from the table description into the location you want. At this point, you should assign an alias to the field by entering a user-friendly name on the "As" line. This will be the name that is displayed to the end user. Make the name meaningful, as again, this is how the end user will refer to the field. In addition to the alias, you should assign a description. The description will be used to give more information to the end user.
You can also add a field to the query by clicking on a blank column in the current clause and selecting the desired table and field in the drop downs.
In addition to selecting a column from an existing table, there are times that you may want to reformat the data or use other built-in SQL functions (concatenate, substr, DECODE …) or even a custom function. You can create these by creating a calculated field. From the Table row of the Visible Fields (SELECT) grid, select <calculated> from the drop down list, then type your custom SQL in the Field cell, below. Because this is a calculated field, it is important to create a user-friendly alias for the field. (By default, Argos will name them "calc1", "calc2" and so on).
The following additional SQL tools are also available:
- Distinct - places the word DISTINCT in front of your first SELECT field. This can be useful for eliminating duplicates, but make sure your table joins are correct before resorting to this technique.
- Summing - allows you to summarize the result of your query into groups using SQL aggregate functions like COUNT, SUM, MIN, MAX, AVG, etc. When you choose Summing, another row is added to the selected fields row display. You then specify how you would like to handle the grouping of each individual field. Normally all fields that do NOT have a SQL aggregate applied to them should be included in the GROUP BY clause (by choosing GROUP BY). Note that turning on Summing Options also activates the HAVING tab so you can add conditionals to your aggregates, such as "HAVING SUM(INVOICE_AMOUNT) > 50".
- Security - Set Column Level Security on your query. Allow or deny certain users or groups access to specific columns of a table.
- Table - name of table selected field is from.
- Field - name of selected field.
- Type - datatype of a selected field.
- As - you can add an alias for the selected field. If you are using an inline view subquery within Oracle, and you assigned an alias to a field in your subquery, the alias will be enclosed within quotes by default. This is an Oracle convention. If you use this field within a report, you must create another alias for it, and omit the enclosing quotes.
- Description - you can add a description for the selected field.
- The following options only appear after a field has been added to the query.
- Left and Right arrows - change the order of the fields in your query.
- Field Security - set the security for the current field.
- Delete - delete the selected field from the query.
Conditional Fields

The Conditional Fields (WHERE) tab is used to limit the query by some criteria. Fields (columns) are defined or selected the same way as described when creating the select statement (double click on the column you wish to add or select the table and field name from the drop down lists). To add the actual condition, click on the ellipsis on the Condition line and enter the condition that needs to be met.
In addition to linking conditions together using AND/OR, you can create conditional groups to help you manage more complex queries. Conditional groups can also have multiple levels of sub groups if necessary. This is depicted above in the Conditional Groups box which shows you the hierarchy of groups you have created. Selecting one of these groups or the root level will allow you to see the different conditions that have been created for that group.
| Icon | Name | Definition |
|---|---|---|
|
|
Add | Add a new conditional group. You can add groups at the root level or as a sub group to another group. |
|
|
Delete | Delete the selected conditional group and all associated conditionals sub groups. |
|
|
Free Type / Visual Designer | Toggle between Visual Design mode and Free Type. Note that this allows you to use the Visual Design for the query, but Free Type for the WHERE clause (which is typically the most complicated part of a query).. |
| and/or | Select AND or OR as the condition. When using AND to join conditions, the conditions on either side of the AND must be true for the record to be included in the dataset. When using OR, just one condition needs to be true for the record to be included in the dataset. | |
| Table | Select the table from the list of tables or choose calculated to set a condition for a calculated field. | |
| Field | Add the field. For a calculated field, click on the ellipsis button to create the condition in the SQL Editor screen. | |
| Condition | Enter a condition or click on the ellipsis button to create the condition in the SQL Editor screen. |
Conditional Fields using Free Type

 - add System Variables or Parameters to your query.
- Operators - can be used to help you build your WHERE clause.
Ordering

To set the sort order of the data you will need to use the Ordering (Order By) tab. This is similar to adding the Conditional fields in that you select the table and the appropriate columns. Once selected, you then tell Argos if the sort should be Ascending or Descending.
- If you need additional help creating DataBlocks, refer to the Getting Started with DataBlocks page.
- To read a step-by-step tutorial on how to create a Report Query, refer to Example 2 - Report Query in the Argos DataBlock Designers Guide.